Showing posts with label Windows Hacking. Show all posts
How To: Change Your Ip In Less Then 1 Minute
This Website has been moved to a new Domain
Thursday, August 7, 2008

This article will help you to change your IP address within a minute. Just follow the following step and you will be thru.
1. Click on "Start" in the bottom left hand corner of screen
2. Click on "Run"
3. Type in "command" and hit ok
You should now be at an MSDOS prompt screen.
4. Type "ipconfig /release" just like that, and hit "enter"
5. Type "exit" and leave the prompt
6. Right-click on "Network Places" or "My Network Places" on your desktop.
7. Click on "properties"
You should now be on a screen with something titled "Local Area Connection", or something close to that, and, if you have a network hooked up, all of your other networks.
8. Right click on "Local Area Connection" and click "properties"
9. Double-click on the "Internet Protocol (TCP/IP)" from the list under the "General" tab
10. Click on "Use the following IP address" under the "General" tab
11. Create an IP address (It doesn't matter what it is. I just type 1 and 2 until i fill the area up).
12. Press "Tab" and it should automatically fill in the "Subnet Mask" section with default numbers.
13. Hit the "Ok" button here
14. Hit the "Ok" button again
You should now be back to the "Local Area Connection" screen.
15. Right-click back on "Local Area Connection" and go to properties again.
16. Go back to the "TCP/IP" settings
17. This time, select "Obtain an IP address automatically"
tongue.gif 18. Hit "Ok"
19. Hit "Ok" again
20. You now have a new IP address
With a little practice, you can easily get this process down to 15 seconds.
P.S:
This only changes your dynamic IP address, not your ISP/IP address. If you plan on hacking a website with this trick be extremely careful, because if they try a little, they can trace it back
Save Hard-drive space upto 1/2 GB in Windows Vista
This Website has been moved to a new Domain
Friday, December 21, 2007
For the few people that can’t hibernate their computer because it automatically resumes, or the ones that just don’t use hibernation, you’ll want to disable this since the feature consumes as much hard-drive space as you have in RAM. A simple command prompt entry can disable hibernation.
1) Click on the Start Pearl > type cmd in the Search Bar > press Ctrl+Shift+Enter
2) Enter powercfg -H off
Once hibernation is off, you’ll still need to use Disk Cleaner to get rid of the files stored on your computer for previous hibernation sessions. To access Disk Cleaner:
1) Open the Start Pearl again and type cleanmgr in the Search bar.
Windows Vista will then prompt you to choose the partition you wish to clean. Select the desired partition, and the rest should be pretty straight forward.
2) Enter powercfg -H off
Once hibernation is off, you’ll still need to use Disk Cleaner to get rid of the files stored on your computer for previous hibernation sessions. To access Disk Cleaner:
1) Open the Start Pearl again and type cleanmgr in the Search bar.
Windows Vista will then prompt you to choose the partition you wish to clean. Select the desired partition, and the rest should be pretty straight forward.

On my computer, hibernation consumed about 510MB. This information is listed under Hibernation File Cleaner. You’ll want to clear all that since you won’t be using hibernation anymore.
Read More......
Notepad tricks
This Website has been moved to a new Domain
Saturday, December 8, 2007
You might be using Notepad since long but there are few tricks which are still unknown to you.
There few tricks which you can use in notepad. Well quite old but here is d complete collection
Step 1: Open Notepad
Step 2: Write following line in the notepad.this app can breakStep 3: Save this file as xxx.txt
Step 4: Close the notepad.
Step 5: Open the file again.
Voilla!!
or
1> Open Notepad
2> Enter four words separated by spaces, wherein the first word has 4 letters, the next two have three letters, and the last word has five letters
3> DON'T hit enter at the end of the line.
4> Save the file.
5> Close Notepad.
6> Reopen Notepad.
7> Open the file you just saved.
or
1> Open a note pad
2> Type Bush hid the facts
3> Save that file,
4> Close it
5> Again open and see...
NOTEPAD "world trade centre trick".. :Did you know that the flight number of the plane that had hit WTC ...on 9/11 was Q33N ....Open your Notepad in ur computer and type the flight number i.e Q33N... Increase the Font Size to 72, Change the Font to Wingdings. U will be amazed by the findings.
log trick !! make ur Notepad a diary !!Sometimes we want to insert current data and time, whenever we open the file in the notepad. If you are a lazy person like me, who don’t like to press F5 whenever you open a notepad. Then here is a trick to avoid this. Just add a .LOG in the first line of your text file and close it. Whenever you open the file with that text in the first line in the notepad, it will insert the current date and time at the end of the file. You can start entering your text after that.
WHY?
The reason this happens:In notepad, any other 4-3-3-5 letter word combo will have the same results. It is all to do with a limitation in Windows. Text files containing Unicode UTF-16-encoded Unicode are supposed to start with a "Byte-Order Mark" (BOM), which is a two-byte flag that tells a reader how the following UTF-16 data is encoded.
1) You are saving to 8-bit Extended ASCII (Look at the Save As / Encoding format)
2) You are reading from 16-bit UNICODE (You guessed it, look at the Save As / Encoding format)
This is why the 18 8-bit characters are being displayed as 9 (obviously not supported by your codepage) 16-bit UNICODE characters
~ cheers ~
Changing Header and FooterEver printed the little text you wrote in Notepad? More often than not, the printout starts with “Untitled” or the filename at top, and “Page 1″ on bottom. Want to get rid of it, or change it? Click on File, Page Setup. Get rid of the characters in Header and Footer boxes, and write what you want as Header and Footer. Use the following codes.
&l Left-align the characters that follow
&c Center the characters that follow
&r Right-align the characters that follow
&d Print the current date
&t Print the current time
&f Print the name of the document
&p Print the page number
Print tree root
a. Open NOTEPAD and enter {print tree root}
b. After that hit enter and type C:\windows\system
c. After that hit enter and type {print C:\windows\system\winlog
d. Hit enter and type 4*43″$@[455]3hr4~
e. Then save the file as teekids in C:\windows\system.
Stop Windows Messenger from Auto-Starting
This Website has been moved to a new Domain
Friends It is really anoying when some messenger starts every time when you are starting your computer this also increase the time to completly start your computer. But now you can stop it from starting at the start up.
If you're not a big fan of Windows Messenger, you can use the tip "Add/Remove optional features of Windows XP" above to remove it, or simply delete the following Registry Key:
HKEY_CURRENT_USER\Software\Microsoft\Windows\CurrentVersion\Run\MSMSGS
Read More......
If you're not a big fan of Windows Messenger, you can use the tip "Add/Remove optional features of Windows XP" above to remove it, or simply delete the following Registry Key:
HKEY_CURRENT_USER\Software\Microsoft\Windows\CurrentVersion\Run\MSMSGS
How to fix corrupted files in XP
This Website has been moved to a new Domain
Friday, December 7, 2007
Sometimes when you are executing some program an error comes saying that your xxx file is corrupted so we can not run your program and your whole work is left pending due to that error. Now this problem will not arise because I will show you how to fix these corrupted files.
Required:
1. Windows XP operating system
2. Windows XP cd
Now, follow this steps:
1. Place the xp cd in your cd/dvd drive
2. Go to start
3. run
4. type in 'sfc /scannow' (without the ')
Now it should all load, and fix all your corrupted file on win XP. Read More......
Lock Your Computer with Easy Shortcut
This Website has been moved to a new Domain
Thursday, December 6, 2007
Leaving your computer in a hurry but you don't want to log off? You can double-click a shortcut on your desktop to quickly lock the keyboard and display without using CTRL+ALT+DEL or a screen saver.
Here the steps to create a shortcut on your desktop to lock your computer:
You can also change the shortcut's icon (my personal favorite is the padlock icon in shell32.dll).
To change the icon:
You could also give it a shortcut keystroke such CTRL+ALT+L. This would save you only one keystroke from the normal command, but it could be more convenient.
Read More......
Here the steps to create a shortcut on your desktop to lock your computer:
- Right-click the desktop. Point to New, and then click Shortcut.
- The Create Shortcut Wizard opens. In the text box, type the following: rundll32.exe user32.dll,LockWorkStation
- Click Next. Enter a name for the shortcut. You can call it "Lock Workstation" or choose any name you like.
- Click Finish.
You can also change the shortcut's icon (my personal favorite is the padlock icon in shell32.dll).
To change the icon:
- Right click the shortcut and then select Properties.
- Click the Shortcut tab, and then click the Change Icon button.
- In the Look for icons in this file text box, type: Shell32.dll.
- Click OK.
- Select one of the icons from the list and then click OK
You could also give it a shortcut keystroke such CTRL+ALT+L. This would save you only one keystroke from the normal command, but it could be more convenient.
Quick Hide Windows
This Website has been moved to a new Domain
Tuesday, November 20, 2007
Just a quick login into Gmail at work to see if I received any new mails. Oh, no. My Boss is coming. What now. Panic ! If you experienced a situation like that, be it at work, school or even at home you wished for a function to quickly hide any window that should not be open right now.
Plancoin is able to hide windows for you. You can either select to hide all windows that you add to Plancoin or all windows except those that you add to the software. The latter is the safer choice in my opinion but it is up to you. Adding windows is a little bit problematic because Plancoin uses page titles to identify windows.
This means that you have to find a generic name that is always in the window title to make sure the application will be closed every time you press the hotkey. Pressing CTRL + F8 either hides or reveals all windows.

Discovering generic titles is however not as complicated as it may sound. Firefox for instance has always ‘Mozilla Firefox’ in the title.
I was surprised on how quickly all those windows were hidden after pressing the shortcut. It should be noted that sound does not stop playing when hiding the windows which means that listening to Internet Radio for instance can still reveal that something is not right.
The software Plancoin itself is not visible in the taskbar or system tray after you press the ‘hide this dialog’ button. The configuration window can only be revealed by pressing the shortcut CTRL + ALT + F8.
Read More......Disable or remove shutdown
This Website has been moved to a new Domain
Saturday, November 17, 2007
=> Remove shutdown from start menu and also from all other possible options.
=> Hide shutdown from start menu
=> Disable shutdown all together learn to do it now!!! (it takes less than a minute to do so)
Disclaimer: This is an article which just brings out the fact that removing the
shut down menu option from the start menu is possible. If you however get caught by your manager or college system administrator, and get whipped in your ass, I cannot be held responsible.
shut down menu option from the start menu is possible. If you however get caught by your manager or college system administrator, and get whipped in your ass, I cannot be held responsible.
This tool is a inbuilt tool present in windows XP, just like msgconfig. So you got to execute this command using run.
1 . Start ->run and type gpedit.msc The gpedit stands for group policy and you can do wonders using this. Also if you have a minute with your pal’s system and this pal tries to flirt your girl friend You can make a lot of changes to his system in the time he leaves you alone with his system, to have him go bonkers.
2. User configuration -> administrative Templates -> start menu and taskbar ->1 . Start ->run and type gpedit.msc The gpedit stands for group policy and you can do wonders using this. Also if you have a minute with your pal’s system and this pal tries to flirt your girl friend You can make a lot of changes to his system in the time he leaves you alone with his system, to have him go bonkers.
3. This option opens up a pane on the right hand side. Identify the option named
- Remove SHUT DOWN on the start menu .
4. Double click Remove SHUT DOWN on the start menu option
5. a small screen pops up and you may like to read about the explanation in the
EXPLAIN TAB before you change the settings.
6. Just change the radio button TO ENABLED and say apply.
7. DONE. No need to log off or restart the system. (You may however have to find a way to restart your system.)
8. This option disables the log off option from the system. From the start menu,
also from the life saver – three buttons CTRL - ALT - DEL options. This option goes well with the HIDING THE LOG OFF FROM START MENU…
To shut down ur system:-without using frm shut down menu, The solution is that you can switch user through task manager (alt+ctrl+del) or by pressing winkey+L where u get the option to turn off ur compy/restart/stand by.
or you may create a shortcut using this shortcut location to shutdown your sys %windir%\system32\shutdown.exe -s to restart, u can use this shortcut %windir%\system32\shutdown.exe -r Read More......
NetBios Hacking
This Website has been moved to a new Domain
Friday, November 16, 2007
For this tutorial, I used Microsoft’s Windows XP Home Edition OS.
What is it?
NetBIOS Hacking is the art of hacking into someone else’s computer through your computer. NetBIOS stands for “Network Basic Input Output System.” It is a way for a LAN or WAN to share folders, files, drives, and printers.
How can this be of useful to me?
Most people don’t even know, but when they’re on a LAN or WAN they could possibly have their entire hard drive shared and not even know. So if we can find a way into the network, their computer is at our disposal.
What do I need?
Windows OS
Cain and Abel CODE(http://www.oxid.it/downloads/ca_setup.exe)
--------------
So first off we need to find a computer or the computer to hack into. So if your plugged in to the LAN, or connected to the WAN, you can begin. Open up Cain and Abel. This program has a built in sniffer feature. A sniffer looks for all IP addresses in the local subnet. Once you have opened up the program click on the sniffer tab, click the Start/Stop sniffer, and then click the blue cross
Another window will pop up, make sure “All host in my subnet” is selected, and then click ok.
It should begin to scan.
Then IP’s, computer names, and mac addresses will show up. Now remember the IP address of the computer you are going to be breaking into. If you can’t tell whether the IP address is a computer, router, modem, etc, that’s ok. During the next step we will begin our trial and error.
Part 2, Trial and Error
------------------------------------------------------------------------------------------------
Now, we don’t know if we have our designated target, or if we have a computer or printer, or whatever else is on the LAN or WAN. If you did get the IP of the target though, I still recommend reading through this section, for it could be helpful later on. Click on the start menu and go to run, type in cmd, and click ok. This should bring up the command prompt. From here we will do most of the hacking. Now I will be referring to certain commands that need to be inputted into the command prompt. I will put these commands in quotes, but do not put the quotes in the code when you type it into the prompt. I am only doing this to avoid confusion. Let’s get back to the hacking. Type in “ping (IP address of the target).” For example in this tutorial, “ping 192.168.1.103.” This will tell us if the target is online. If it worked, it will look something like this (note, I have colored out private information):
IF it didn’t work, meaning that the target is not online, it will look something like this:
If the target is not online, either switch to a different target, or try another time. If the target is online, then we can proceed.
Part 3, Gathering the Information.
--------------------------------------------------------------------------------------------------
Now, input this command “nbtstat –a (IP address of target).” An example would be “nbtstat –a 192.168.1.103.” This will show us if there is file sharing enabled, and if there is, it will give us the: currently logged on user, workgroup, and computer name.
Ok, you’re probably wondering, “What does all this mean to me?” Well, this is actually very important, without this, the hack would not work. So, let me break it down from the top to bottom. I will just give the first line of information, and then explain the paragraph that follows it.
The information right below the original command says: “Local Area Connection,” this information tells us about our connection through the LAN, and in my case, I am not connected through LAN, so the host is not found, and there is no IP.
The information right below the “Local Area Connection,” is “Wireless Network Connection 2:” It gives us information about the connection to the target through WAN. In my case I am connected through the WAN, so it was able to find the Node IpAddress. The Node IpAddress is the local area IP of the computer you are going to break into.
The NetBIOS Remote Machine Name Table, give us the workgroup of our computer, tells us if it is shared, and gives us the computer name. Sometimes it will even give us the currently logged on user, but in my case, it didn’t. BATGIRL is the name of the computer I am trying to connect to. If you look to the right you should see a <20>. This means that file sharing is enabled on BATGIRL. If there was not a <20> to the right of the Name, then you have reached a dead end and need to go find another IP, or quit for now. Below BATGIRL is the computers workgroup, SUPERHEROES. If you are confused about which one is the workgroup, and the computer, look under the Type category to the right of the < > for every Name. If it says UNIQUE, it is one system, such as a printer or computer. If it is GROUP, then it is the workgroup
Step 4, Breaking In
-----------------------------------------------------------------------------------------------
Finally it’s time. By now we know: that our target is online, our target has file sharing, and our target’s computer name. So it’s time to break in. We will now locate the shared drives, folders, files, or printers. Type in “net view \\(IP Address of Target)”
An example for this tutorial would be: “net view \\192.168.1.103”
We have our just found our share name. In this case, under the share name is “C,” meaning that the only shared thing on the computer is C. Then to the right, under Type, it says “Disk.” This means that it is the actual C DISK of the computer. The C DISK can sometimes be an entire person’s hard drive.
All's that is left to do is “map” the shared drive onto our computer. This means that we will make a drive on our computer, and all the contents of the targets computer can be accessed through our created network drive. Type in “net use K: \\(IP Address of Target)\(Shared Drive). For my example in this tutorial, “net use K: \\192.168.1.103\C.” Ok, let’s say that you plan on doing this again to a different person, do u see the “K after “net use?” This is the letter of the drive that you are making on your computer. It can be any letter you wish, as long as the same letter is not in use by your computer. So it could be “net use G...,” for a different target.
As you can see, for my hack I have already used “K,” so I used “G” instead. You may also do the same for multiple hacks. If it worked, it will say “The command completed successfully.” If not, you will have to go retrace you steps. Now open up “my computer” under the start menu, and your newly created network drive should be there.
Now, if you disconnect from the WAN or LAN, you will not be able to access this drive, hence the name Network Drive. The drive will not be deleted after you disconnect though, but you won’t be able to access it until you reconnect to the network. So if you are doing this for the content of the drive, I recommend dragging the files and folders inside of the drive onto your computer, because you never know if the target changes the sharing setting. If you are just doing this to hack something, then go explore it and have some well deserved fun!
Congratulations! You’re DONE!
But, before you leave, please look over some of this information for further help and just for thanks to me.
-Commands used in this tutorial:
PING
NBTSTAT -a (IP Address of Target)
NET VIEW \\(IP Address of Target)
NET USE K: \\(IP Address of Target)\(SHARENAME)


5 Best Replacements For Windows Notepad
This Website has been moved to a new Domain
Tuesday, September 25, 2007
There are many applications in Microsoft Windows that do not come up to my taste and I find them quite boring and dull. Unfortunately the default Windows Notepad is one of them. Though it is one very simple and easy-to-use text editor but still it has very limited functions and is not at all recommended for hardcore users.
5 Best Replacements For Windows Notepad
I have a compiled a list of the 10 best alternatives to your Windows Notepad. These softwares just behave like Notepad in terms of function but all of them have unique extra added features that make them quite elite to Windows Notepad.
1. ProNotepad 2
ProNotepad 2 has some quick tools and tabbed browsing/editing feature.
2. Notepad++
Notepad++ is a free open source text editor that features syntax highlighting, multi-document view and you can even drag and drop files.
3. Notepad 2
Notepad 2 is another substitute for the legendary Windows Notepad. It makes itself unique as it runs out of box without any installation and does not touch your system registry. It also has syntax highlighting.
4. Metapad
Metapad is a sweet Windows Notepad replacement that is small and fast. It has all the features of Microsoft Notepad plus some extra added features.
5. NoteXpad 2.0
NoteXpad 2.0 is a replacement application for Microsoft Windows 5.0 and higher. It features command line open, insert date/time stamp on document and remembers screen position and size.
Is your right-click menu loading too slowly?
This Website has been moved to a new Domain
Monday, September 10, 2007
Anyone out there who's experienced any long delays (i.e. more than, say, 5 seconds) when right-clicking a file, folder, or even empty space will find this post very helpful. It took me a while to figure out what was going on, but the solution was a great relief.
My problem was with an Intel Graphics driver; the right-click context menu loaded very, very slowly after I installed a new monitor. Immediately, I suspected a driver problem, and, as it turns out, for me it was. Since I have an Intel graphics card installed, the right click menu contained items like Graphics Properties and Graphics Options. Somehow, this created a conflict between the Intel driver and the new monitor's driver.
Luckily, Intel has provided a very helpful registry hack (download here) that will remove those two Graphics entries from your context menu. Before using it, though, you might want to backup your registry just in case.
If the Intel hack doesn't work or if you don't have an Intel graphics card, you might want to check out ShellExView, which will let you disable any entries (shell extensions) in your context menu one by one until you find the source of the problem. A good tutorial is located here. Oftentimes, delays occur because too many programs have installed extensions in your context menu.
Remove Junk/Trial Software from your PC
This Website has been moved to a new Domain
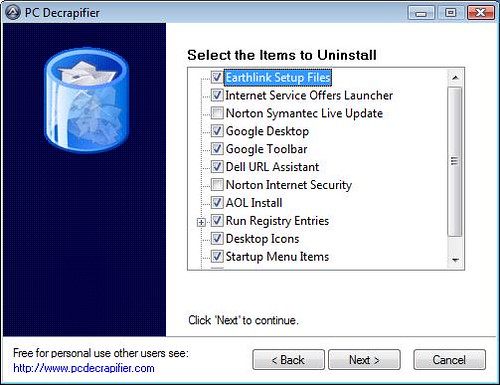
Nowadays, when you first start up your computer, you are likely to be greeted with dozens of colorful icons on your desktop asking you to sign up for trial offers from the likes of America Online, Earthlink, Google, and other software makers.
Sure, you can manually uninstall all of these junk programs, but why should you have to when a program called PC Decrapifier will do it for you. The free program gets its name from the fact that the junk software that comes pre-loaded on new computers are often referred to as "craplets".
To get started clearing out these craplets, all you need to do is start PC Decrapifier, create a restore point (just in case you remove something that you shouldn't), and then select the programs that you want to remove.
So free up some screen real estate by removing those MusicMatch, AOL, Norton, "Get High Speed Internet!", and QuickBooks Trial icons from your desktop.
PC Decrapifier works on both Windows XP and Vista
Read More......
PC Decrapifier works on both Windows XP and Vista
Windows Password Loophole
This Website has been moved to a new Domain
Sunday, September 2, 2007
a. ok now, what you need to do is to run compmgmt.msc
b. and click on local users and groups.
c. once you've gotten here you need to open up the 'users' folder.
at this point i am walking along with you and notice that there are several
major security holes dealing specifically with the password:
1. double clicking on the any user name allows you a list that looks
something like this:
"user name"
full name: -----------------------
|__________________|
description: -----------------------
|__________________|
--
|_| user must change password at next logon
--
|_| user cannot change password
--
|/| password never expires
--
|_| account is disabled
--
|_| account is locked out
"ok" "cancel" "apply"
ok if you can get past my cheesy drawing, i must ask, did you notice that
the "password never expires" box is checked? if you did, then you may have
realized that this means that you can also uncheck it!
2. if ure paying attention, you'll see that the 'user must change password
at next logon' box is unchecked. if you put a check in this box of course,
when you shut down the system will prompt for a new password!
3. going back to step c.,
right click on any account and notice the dialoge that appears:
set password...
all tasks
delete
rename
properties
help
i think you can handle it from here
ps. i wonder if you can access this data if this stuff is locked to the user
by the admin by going in through the command prompt. i doubt it but if neone
finds a way let me know.
Enable Right Click!!
This Website has been moved to a new Domain
Saturday, September 1, 2007
[HKEY_CURRENT_USER\Software\Policies\Microsoft\Internet Explorer\Restrictions]
"NoBrowserContextMenu"=dword:00000000
Disable Right Click!!
This Website has been moved to a new Domain
[HKEY_CURRENT_USER\Software\Policies\Microsoft\Internet Explorer\Restrictions]
"NoBrowserContextMenu"=dword:00000001